021 202 0626
Constipation Causes and Treatment in Cape Town

Constipation Causes and Treatment in Cape Town

Have you ever gone for days without feeling a need to go to the toilet?

While some would think that’s normal, most of the time it’s not.

Although there is no generally accepted number of times a person should have bowel movements, there will be times when you’ll notice that you’re visiting the toilet less often than usual.

When you do go to the toilet, it takes all of your strength to pass hard, dry stools.

These are signs of constipation or the condition of having infrequent bowel movements or difficulty in passing stools.

Let’s talk about constipation, what it is, what causes it, and how it can be treated, as well as when you should take it seriously.


constipated_bowel_vs_normal_bowel

How the Bowel Works

To understand why constipation happens, let us first see the normal process of passing stools from the digestive system.

Food travels to the digestive system and is pushed through the intestines which usually takes between 24 to 72 hours.

From the small intestines, where most of the absorption of nutrients takes place, stool consisting of ingested food, bile, and digestive juices is pushed to the large intestines (colon).

The large intestine (colon) is split into four (4) sections: (1) ascending, (2) transverse, (3) descending, and, (4) sigmoid colon. which connects to the rectum and anus.

Food stays within a section for a while, just enough for the digestive tract to absorb fluids and nutrients or process and expel waste.

One of the large intestine’s functions is to absorb most of the fluid that the stool contains to transform it from liquid to solid. The longer this process takes, the more reabsorption occurs, resulting in an increasingly solid stool.

A final bout of reabsorption occurs once the stool reaches the sigmoid colon, before entering the rectum.

The rectal walls will then be distended, signaling the internal anal sphincter to relax. This is the point where the body decides whether to physically expel or hold the stool.

Expelling or retaining the stool in the rectum is controlled by the pelvic floor muscles particularly the puborectalis and external anal sphincter.

The puborectalis forms a single-like formation around the rectum, called the anorectal angle. When you voluntarily relax your external anal sphincter, the stool is finally expelled.

The whole process is coordinated to the brain and is communicated through the sensory nerve pathways that communicate signals such as pain or fullness.

These nerves can also tell the brain if the rectum is filled with gas or stool, which is why you can consciously decide whether to hold or expel it.


Why Constipation Occurs

When you are constipated, a desire to visit the toilet is not enough to signal your body into action, making the whole process of expelling waste more tedious.

This problem usually arises due to two reasons:

  1. The stool’s excessively slow movement through the colon, causing over-absorption of liquid that makes the stool too dry and too hard.
  2. Tightening of the pelvic floor muscles due to pelvic floor dysfunction, aging, or childbirth.

Both problems make the anorectal angle more acute, making it too difficult to expel waste.

 large_intestine_constipation_causes


What is Chronic Constipation?

Going a day without a bowel movement is not necessarily a cause for alarm.

Generally, constipation becomes chronic when you defecate less than three times per week for several months.

Chronic constipation interferes with people’s ability to go about their daily tasks and can cause excessive straining and extreme discomfort during bowel movements.

Signs and symptoms of chronic constipation include:

  1. Bowel movement that occurs less than three (3) times per week
  2. Consistent passing of lumpy hard stools
  3. Continuous straining to have bowel movements
  4. Feeling of blockage in the rectum
  5. Feeling as though you cannot empty the rectum
  6. Needing help to empty the rectum by pressing the abdomen or using the finger to remove stool from the rectum.

If you have experienced two or more of these symptoms for the last two or three months, constipation may be considered chronic. It’s best to book an appointment with your Gastroenterologist right away.
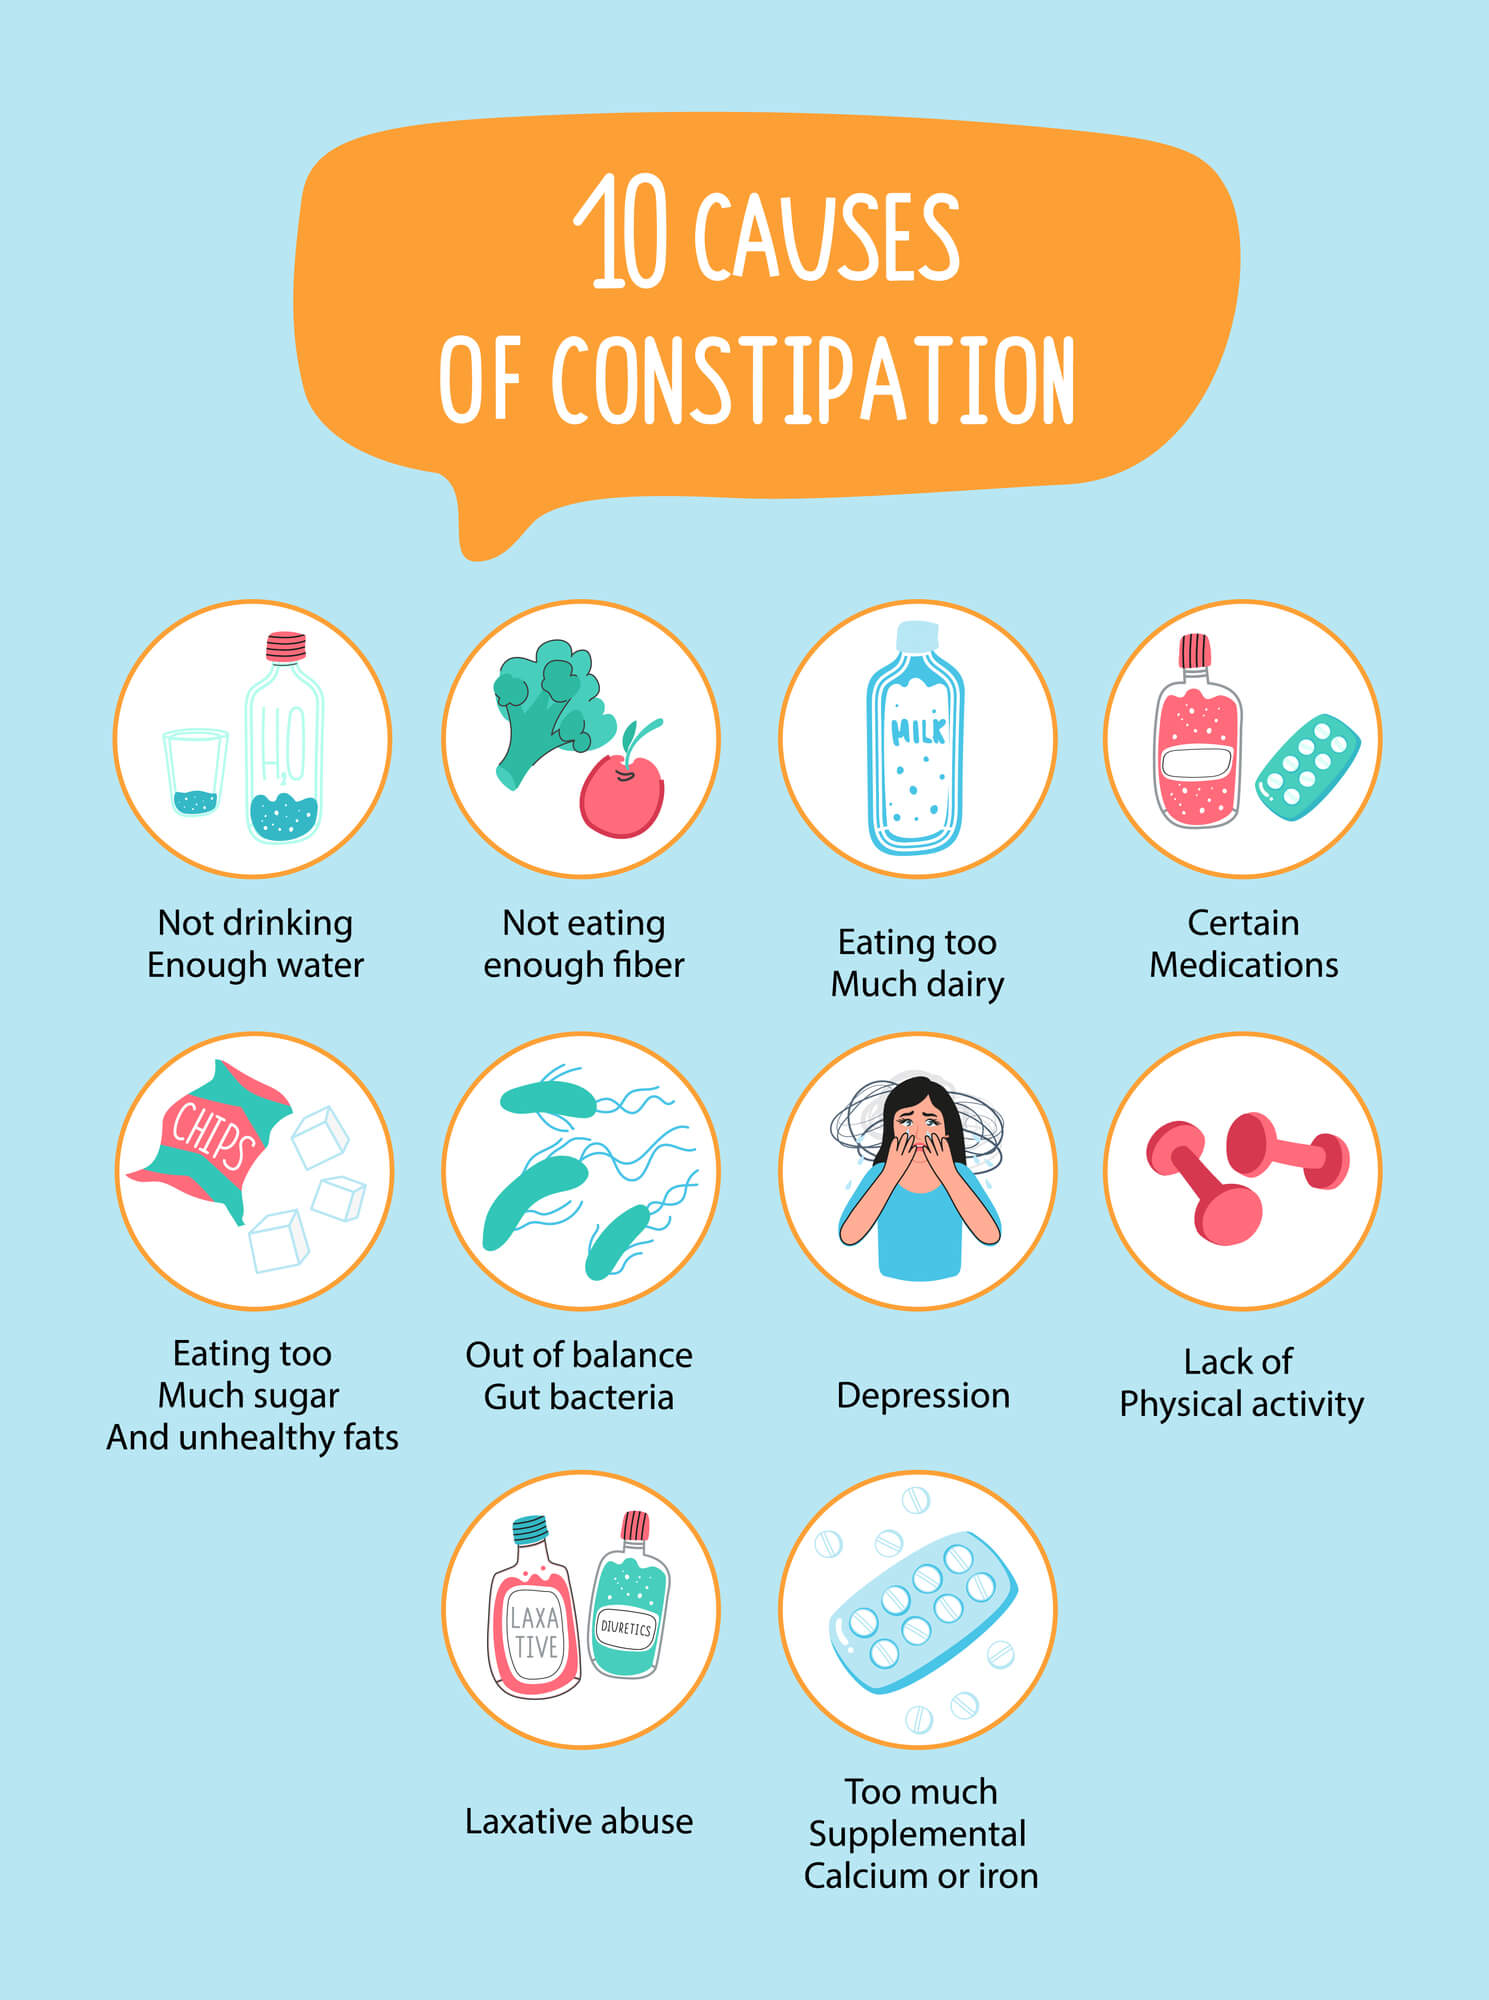
 causes-of-constipation

Causes of Constipation

Chronic constipation has many possible causes:

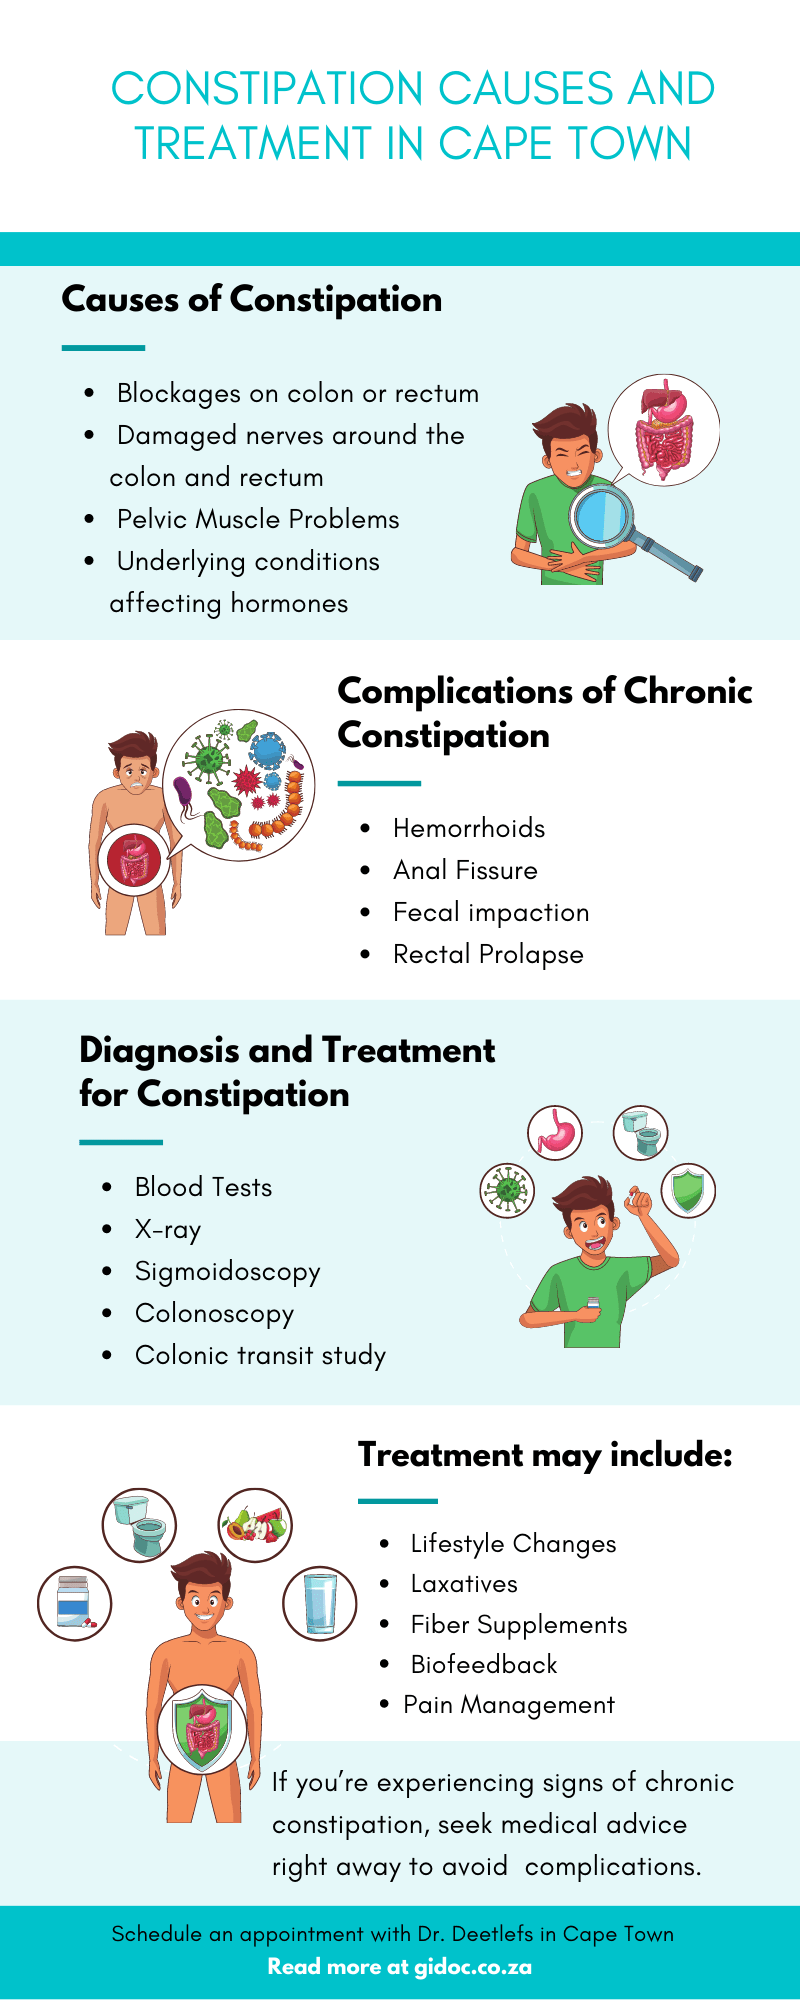
1. Blockages in the colon or rectum

A blockage in the colon or rectum can slow down or completely stop stool movement.

Blockages may be caused either by anal fissures or tiny tears in the skin around the anus, bowel obstruction in the intestines, colon or rectal cancer and other abdominal cancers that presses on the colon, bowel stricture or narrowing of the colon, rectocele or a rectum bulge through the back wall of the vagina.


2. Damaged nerves around the colon and rectum

Since nerves have a vital role in the transmission of stool, it’s natural for neurological problems to cause issues with bowel movements.

Autonomic neuropathy or damaged nerves, multiple sclerosis, Parkinson’s disease, spinal cord injury, and stroke are some of the conditions that bring about chronic constipation.

3. Pelvic muscle problems

Weakened pelvic muscles that are unable to relax or contract correctly can cause chronic constipation.

4. Underlying conditions affecting hormones

Underlying conditions affecting hormones such as diabetes, overactive thyroid (hyperthyroidism), underactive thyroid gland (hypothyroidism), and pregnancy may cause a prolonged bowel movement.

Aging, pregnancy, dehydration, low-fiber diet, sedentary lifestyle, medications (e.g., sedatives, pain relievers, anti-depressants, blood pressure control), and some mental health conditions (e.g., eating disorder, depression) can increase one’s risk of developing chronic constipation.


Complications of Chronic Constipation

If chronic constipation remains untreated, the patient may develop the following complications:

1. Hemorrhoids – These are swollen veins in the anus that are caused by continuous straining to have a bowel movement. Hemorrhoid pain can be sudden and severe. The patient might feel or see a lump around the anus.

2. Anal fissure – This is a torn skin in your anus that is caused by a large or hard stool.

3. Fecal impaction – This is the accumulation of hardened stool that gets stuck in the intestines and cannot be expelled.

This is a very serious condition and needs medical attention right away. Fecal impaction won’t go away on its own. You need to have it removed for you to get better.

4. Rectal prolapse – This occurs when the intestine starts protruding from the anus due to continuous straining. Surgery is needed to repair the prolapse.


Diagnosis and Treatment for Constipation

in Cape Town

Treating constipation starts with diagnosing and trying to find the cause. Several tests can be made including the following:

  • Blood tests – Your doctor will watch for systemic conditions such as hypothyroidism or high calcium levels.
  • X-ray – This will show if your intestines are blocked and if there is stool present throughout the colon.
  • Sigmoidoscopy – Examination of the rectum and lower, or sigmoid, colon
  • Colonoscopy – Examination of the rectum and entire colon
  • Colonic transit study – You may be asked to swallow a capsule with a wireless recording device or radiopaque marker. The progress of the capsule through your colon will be recorded for 24 to 48 hours and will be shown on X-rays.
Constipation Causes and Treatment in Cape Town


Once the underlying cause is determined, your Gastroenterologist will recommend an appropriate treatment plan. Treatment may include:

1. Lifestyle changes: The doctor may recommend simple lifestyle changes such as stress management, daily exercise, and quitting smoking.

2. Laxatives: These are drugs that trigger muscle contractions in the small intestines to help advance bowel movement.

3. Fiber supplements: If the patient is found lacking in fiber, fiber supplements may be helpful to aid in digestion and defecation.

4. Biofeedback: Assessment and measurement of muscle tension in the rectum to teach physical techniques that improve pelvic muscle performance so the patient can pass stool more easily.

5. Pain management: This focuses on relieving the pain associated with chronic constipation.

6. Surgery: Some cases may need surgery, especially if there are structural issues in the small intestines such as rectocele.

If you’re experiencing signs of chronic constipation, seek medical advice right away to avoid complications.

Schedule an appointment with Dr. Deetlefs in Cape Town, South Africa to get prompt medical assistance for chronic constipation and other issues with your digestive health.


GIDoc Cape Town

Patient-focused GI treatments and procedures in Cape Town.

Monday-Friday 8AM-4PM.

Connect with Us

© Dr. Eduan Deetlefs, Registered Gastroenterologist, GI Doc Cape Town

Our website information is not intended or implied to be a substitute for professional medical advice, diagnosis or treatment. Please consult a doctor about your specific condition. Only a trained physician can determine an accurate diagnosis and proper treatment.

What is (PEG) Placement of Feeding Tubes

What is (PEG) Placement of Feeding Tubes

EG stands for percutaneous endoscopic gastrostomy.

It is a procedure in which a flexible feeding tube is placed through the abdominal wall and into the stomach.

PEG allows nutrition, fluids and/or medications to be put directly into the stomach, bypassing the mouth and oesophagus.

When Does One Require a PEG?

If you have trouble swallowing or can’t eat or drink enough through your mouth, you may just need a feeding tube. You may get one through your nose or mouth for a few days or weeks while you recover from an illness.

But if you have long-term or serious reasons why you’re unable to eat, such as dementia or terminal cancer, you may need to undergo a fairly simple surgery called a PEG.

Your surgeon generally cuts through the skin of your belly and inserts the tube right into your stomach to deliver a liquid food mixture or a formula.

How is the PEG Performed?

Your doctor will use a lighted flexible tube called an endoscope to guide the creation of a small opening through the skin of the upper abdomen and directly into the stomach.

This procedure allows the doctor to place and secure a feeding tube into the stomach.

Patients generally receive an intravenous sedative and local anaesthesia, and an antibiotic is given by vein before the procedure.

Patients can usually go home the day of the procedure or the next day.


3 Different PEG Placements

There are, however, three different methods in which a PEG can be placed.

The method used by your doctor will depend on a variety of factors, the most common technique being the aforementioned endoscopic placement.

1.    Endoscopic

Even within this method, there are variations in methodology. The most common is referred to as the “Push and Pull Technique” and is the method that will be described below.

The doctor needs to be assisted by another operator (apart from the normal support staff).

Before the PEG tube placement, an antibiotic is given to the patient.

Once this has been done, the doctor will make sure there are no obstructions, such as oesophagal obstruction or an ulcer at the site where the PEG tube would be placed, that may get in the way of the PEG tube placement. This is achieved by performing an upper endoscopy.

With the endoscope in the stomach, the second operator will find an appropriate point on the abdomen by looking for transillumination (light from the endoscope inside the stomach) through the abdominal wall.

The position is confirmed when the second operator presses on the chosen area with one finger, and a clear indentation of the gastric wall is seen by the doctor with the endoscope.

This technique that combines the second operator pressing with a finger and the doctor looking for the point of the press with the endoscope increases the safety of PEG tube insertion.

Once an appropriate site on the abdomen is selected, the abdominal wall is cleaned with an iodine-based solution, and the second operator dons sterile gloves.

A local anaesthetic is injected at the site. A small skin incision may then be made at the site (approximately 1 cm in length).

The medical team will then insert the PEG tube going through several technical steps.

2.    Radiological

Radiologically-inserted gastrostomy tubes are placed using fluoroscopic-guidance. Radiologic insertion of a gastrostomy tube requires that the stomach be distended (swollen) with air.

This is often done with a nasogastric tube (one that goes to the stomach via the nose) though alternative techniques may also be used.

Once the stomach is distended, an appropriate site is chosen using fluoroscopy (typically the mid-body of the stomach). A 2-cm square around the site is designated, and a local anaesthetic is injected at the four corners.

The doctor then performs a gastropexy to prevent the stomach from moving up into the chest.

Following this, the tube is placed after some more anaesthetic, an incision, and a couple more technical steps.

3.    Surgical

Surgical gastrostomy can be carried out either laparoscopically (minimally invasive) or using an open approach.

Laparoscopic gastrostomy tube placement is performed similarly to radiologic gastrostomy tube placement.

After the laparoscope is inserted, the gastrostomy site is chosen and grasped. T-fasteners are then used to affix the stomach to the abdominal wall, and the gastrostomy tube is placed.

Open insertion of a gastrostomy tube involves the creation of a midline incision. The stomach is located, and a gastric incision is made.

percutaneous_ endoscopic_gastrostomy

The gastrostomy tube is then inserted, and the gastric and midline incisions are closed.

The Day Before Your Procedure

Instructions for eating and drinking before PEG Surgery

  • Do not eat anything after midnight the night before your surgery. This includes hard candy and gum.
  • Between midnight and up until 2 hours before your scheduled arrival time, you may drink a total of 300ml of water.
  • Starting 2 hours before your scheduled arrival time, do not eat or drink anything. This includes water.

How Should I Care for the PEG Tube?

  • Always wash hands before handling your PEG tube.
  • Clean the site with soap and water daily. DO NOT use hydrogen peroxide or any special cleansers. You may use a q-tip or gauze to swab gently around the site. Rinse well and pat dry. This may be done in the shower.
  • Apply a clean dressing to the site. This should be changed daily or as needed. This dressing should be placed over the external bumper.
  • When changing the dressing, look for redness on your skin, drainage on the old dressing, or leakage at the site of insertion. If found, report to your doctor.
  • Tape the tube to your skin to prevent tugging on the skin leading to skin breakdown. Paper tape works well and is gentle on your skin.
  • Turn the bumper (or sometimes called a bolster, the piece of soft plastic that sits on the skin to prevent the tube from slipping back into the stomach) and tube halfway at least twice a day to prevent skin breakdown. Also gently push and pull the tube in and out – 1/2 cm each day.
  • Flush tube with 30 ml of water at least once a day.

 tube_feeding_after_peg

How are Feedings Given? Can I Still Eat and Drink?

Specialized liquid nutrition, as well as fluids, are given through the PEG tube.

If the PEG tube is placed because of swallowing difficulty (e.g. after a stroke), there will still be restrictions on what you can take in orally.

Although a few PEG patients may continue to eat or drink after the procedure, this is a very important issue to discuss with your doctor as instructions will vary based on your specific case.

Complications from PEG Placement

While not common, complications can occur with the PEG placement.

Possible complications include pain at the PEG site, leakage of stomach contents around the tube site, and dislodgement or malfunction of the tube.

Possible complications include infection of the PEG site, aspiration (inhalation of gastric contents into the lungs), bleeding and perforation (an unwanted hole in the bowel wall).

Your doctor can describe symptoms that could indicate a possible complication.

How long do these tubes last? How are they removed?

PEG tubes can last for months or years. This, naturally, varies case-by-case.

However, because they can break down or become clogged over extended periods, they might need to be replaced.

Your doctor can easily remove or replace a tube without sedatives or anaesthesia, although your doctor might opt to use sedation and endoscopy in some cases.

Your doctor will remove the tube using firm traction and will either insert a new tube or let the opening close if no replacement is needed.

PEG sites close quickly once the tube is removed, so accidental dislodgement requires immediate attention.

PEG vs. PEJ

When preparing for a PEG tube placement, you may hear the term “PEJ”. Let’s clear up any possible confusion around the terms ‘PEG’ and ‘PEJ’.

A PEG tube is a feeding tube that is placed in your stomach.

If the tube can’t be placed into your stomach, you may have a PEJ tube placed instead. A PEJ tube is placed in your jejunum, which is the second part of your small intestine.

The tube is placed during an endoscopy (a procedure that lets your doctor see inside your stomach and small intestine).

A PEJ tube placement is, therefore, a similar procedure to a PEG tube placement with the only difference being that the tube gets inserted into the jejunum instead of the stomach.

If you need long-term nutrition support, your doctor may convert your PEG into a low-profile gastrostomy button into your stomach.

Your doctor may convert your PEJ into a low-profile jejunostomy button into your small intestine. With both of these buttons, you will attach the feeding adapter to get nutrition.

PEG - Placement of Feeding Tubes

Summary

A PEG tube placement is a fairly straightforward procedure.

It may sound complicated to a first-time reader but it’s standard practice to help patients who have feeding complications and shouldn’t be feared.

If you would like to book an appointment with a gastrointestinal (GI) specialist or would simply like more information on a particular GI topic, don’t hesitate to use our online booking form or call us at 021 551 8678.


GIDoc Cape Town

Patient-focused GI treatments and procedures in Cape Town.

Monday-Friday 8AM-4PM.

Connect with Us

© Dr. Eduan Deetlefs, Registered Gastroenterologist, GI Doc Cape Town

Our website information is not intended or implied to be a substitute for professional medical advice, diagnosis or treatment. Please consult a doctor about your specific condition. Only a trained physician can determine an accurate diagnosis and proper treatment.

Gastrointestinal Bleeding Lesions: Causes, Diagnosis and Treatment

Gastrointestinal Bleeding Lesions: Causes, Diagnosis and Treatment

Pronounced “lee-sion” with an emphasis on the “lee,” a lesion can be almost any damage or abnormal change involving any tissue or organ due to physical trauma or disease.

The word “lesion” comes from the Latin noun “laesio” meaning “an attack or injury” which is related in Latin to the verb “laedere” = “to hurt, strike or wound.”

Because the definition of a lesion is so broad, the varieties of lesions are virtually endless.

Lesions can occur anywhere in the body and are generally classified by their patterns, their sizes, their locations, or their causes.

Here we look at some of the ways in which lesions vary from one another and then we will take a closer look at gastrointestinal (GI) lesions and their treatment process.

1. Cancerous Lesions

Lesions can be categorized according to whether or not they are caused by cancer. A benign lesion is non-cancerous whereas a malignant lesion is cancerous.

For example, a biopsy of a skin lesion may show that the lesion is benign or malignant.

It’s also possible to tell if the lesion is in a state of evolving into a malignant lesion. In this case, it would be called a pre-malignant lesion.

2. Variations in Lesion Patterns

Lesions can be defined according to the patterns they form.

The particular pattern which a lesion forms can also form the basis of it’s naming convention.

A bullseye, or target, lesion, for example, is one that looks like the bullseye on a target.

An example of its identification is through that of an X-ray of the duodenum where the bullseye lesion can represent a tumour with an ulcer in the centre.

Another distinct, patterned lesion is that of the coin lesion. This lesion is a round shadow resembling a coin on a chest X-ray It, too, is usually due to a tumour.


3. Lesions Named After People

In typical human fashion, we like to name many things after ourselves.

Lesions are not exempt from this. Lesions can be named after the person who first described them.

For instance, a Ghon lesion (or Ghon focus) is the scar-like “signature” in the lungs of adults left by tuberculosis in childhood.

4. Variations in Lesion Sizes

Lesions also vary by name and categorization based on size.

A gross lesion is one that can be seen with the naked eye.

A microscopic or histologic lesion requires the magnification provided by a microscope to be seen.

Lesions on the molecular level have also been classified. The basis of sickle cell disease, for example, is a molecular lesion as it is only detectable on the DNA level.


5. Location-Based Lesions

Location is another basis for naming lesions. In neurology, a central lesion involves the brain or spinal cord, i.e., the central nervous system.

This is in contrast to a peripheral lesion which involves the nerves away from the spinal cord and does not involve the central nervous system.

6. Many Different Names for Many Different Lesions

There is a virtually endless assortment of lesions in medicine:

Primary lesions, secondary lesions, impaction lesions, indiscriminate lesions, irritative lesions, etc.

Many are named after people including the Armanni-Ebstein lesion, a Bankart lesion, a Blumenthal lesion, and so on. 

gastrointestinal_lesions

Gastrointestinal Lesions

As we’ve seen, a lesion can be almost any damage or abnormal change involving any tissue or organ due to physical trauma or disease.

A gastrointestinal lesion can often result in bleeding. A symptom of a lesion, or general disorder in your digestive tract, blood may appear in your stool or vomit although it isn’t always visible.

The level of bleeding can range from mild to quite severe so it is important to know how to read the signs so that you may get help as soon as possible.

Your doctor may use sophisticated imaging technology to locate the cause of bleeding followed by varying treatment depending on the gastrointestinal bleeding.


Causes of Gastrointestinal Bleeding Lesions

If bleeding occurs in your oesophagus, stomach, or the initial part of the small intestine (duodenum), it’s considered upper GI bleeding.

Bleeding in the lower small intestine, large intestine, rectum, or anus is called lower GI bleeding.


Causes of Upper GI Bleeding

Peptic ulcers are a common cause of GI bleeding. These ulcers are open lesions that develop in the lining of your stomach or duodenum.

An infection from H. pylori bacteria usually causes peptic ulcers.

Another cause of upper GI bleeding can be the result of enlarged veins in your oesophagus tearing. This is a condition called oesophageal varices.

Tears in the walls of your oesophagus can also cause GI bleeding.

A quite serious cause of upper GI bleeding is that of Dieulaofoy’s Lesion which occurs in the stomach wall. While rare, it can be life-threatening and must be ruled out when GI bleeding occurs.


Causes of Lower GI Bleeding

Colitis, inflammation of the colon, is the most common cause of lower GI bleeding. Colitis has multiple causes, including infection, food poisoning, and Crohn’s disease.

Haemorrhoids are another common cause of GI bleeding. A haemorrhoid is an enlarged vein in your rectum or anus. These enlarged veins can rupture and bleed.

symptoms_of_bleeding_lesions

Symptoms of GI Bleeding

There are a few things that you can look for if you suspect that you might have GI or rectal bleeding.

Your stool might become darker and sticky, like tar, if bleeding comes from the stomach or upper GI tract.

You may pass blood from your rectum during bowel movements, which could cause you to see some blood in your toilet or on your toilet tissue.

This blood is usually bright red. Vomiting blood is another sign that there’s bleeding somewhere in your GI tract.

If you experience any of these symptoms call your doctor immediately.

GI bleeding could signal a life-threatening condition and, as such, immediate medical treatment is essential.

Also, seek treatment immediately if you experience any of the following symptoms:

  • shortness of breath
  • paleness
  • weakness
  • dizziness

These symptoms may also signal severe bleeding.


Symptoms of Shock

If your bleeding starts abruptly and progresses rapidly, you could go into shock. Signs and symptoms of shock include:

  • Drop in blood pressure
  • Not urinating or urinating infrequently, in small amounts
  • Rapid pulse
  • Unconsciousness


When to See a Doctor?

If you have symptoms of shock, you or someone else should call your emergency medical number.

If you’re vomiting blood, see blood in your stools or have black, tarry stools, seek immediate medical care. For other indications of GI bleeding, make an appointment with your doctor.


Request an Appointment with Dr Deetlefs


treatment_of_bleeding_lesions


Diagnosis of GI Bleeding

Diagnosis of the underlying cause of your GI bleeding will usually start with your doctor asking about your symptoms and medical history.

Your doctor may also request a stool sample to check for the presence of blood along with other tests to check for signs of anaemia.

Upper GI bleeding is most commonly diagnosed after your doctor performs an endoscopic examination.

Endoscopy is a procedure that involves the use of a small camera located atop a long, flexible endoscopic tube your doctor places down your throat.

The scope is then passed through your upper GI tract.

The camera allows your doctor to see inside your GI tract and potentially locate the source of your bleeding.

Because endoscopy is limited to the upper GI tract, your doctor may perform an enteroscopy. This procedure is performed if the cause of your bleeding isn’t found during an endoscopy.

An enteroscopic exam is similar to an endoscopy, except there’s usually a balloon attached to the camera-tipped tube. When inflated, this balloon allows your doctor to open up the intestine and see inside.

To determine the cause of lower GI bleeding, your doctor may perform a colonoscopy. During this test, your doctor will insert a small, flexible tube into your rectum.

A camera is attached to the tube so your doctor can view the entire length of your colon.

Air moves through the tube to provide a better view. Your doctor may take a biopsy for additional testing.

 lesion_prevention_treatment

Treatment for GI Bleeding Lesions

An endoscopy can be useful, not only in diagnosing GI bleeding but also for treating it.

The treatment is called haemostasis of bleeding lesions and the idea is to stop the bleeding.

The use of special scopes with cameras and laser attachments, along with medications can be used to stop the bleeding.

In addition, your doctor can use tools alongside scopes to apply clips to the bleeding vessels to stop the bleeding.

If haemorrhoids are the cause of your bleeding, over-the-counter (OTC) treatments might work for you.

If you find that OTC remedies don’t work, your doctor might use a heat treatment to shrink your haemorrhoids.

If infection is the cause then the doctor might prescribe antibiotics which are usually enough to treat infections.


How to Prevent a Lesion?

You cannot always predict and therefore prevent lesions.

There are some lesions which you can reduce the probability of occurrence of. Gastrointestinal lesions, for example, may be less likely to occur if you follow a healthy lifestyle.

By “healthy lifestyle” I mean the age-old yet perfectly-sound advice of the following:

  1. Follow a regular exercise routine.
  2. Limit your use of non-steroidal anti-inflammatory drugs.
  3. Eat according to a healthy meal plan with lots of fruit and vegetables.
  4. Avoid smoking and drinking alcohol.
  5. Establish and stick to a consistent sleep routine.
  6. Reduce stress where possible through practices such as meditation.

 gastrointestinal-lesions


Treating GI Bleeding Lesion


Gi Doc Capetown is a practice founded to provide medical solutions in the area of gastroenterology.

Over the years, Dr Eduan Deetlefs has earned the reputation of a trusted health expert providing consultative, diagnostic, and therapeutic endoscopic and related services to patients in Cape Town and beyond. 

GIDoc Cape Town

Patient-focused GI treatments and procedures in Cape Town.

Monday-Friday 8AM-4PM.

Connect with Us

© Dr. Eduan Deetlefs, Registered Gastroenterologist, GI Doc Cape Town

Our website information is not intended or implied to be a substitute for professional medical advice, diagnosis or treatment. Please consult a doctor about your specific condition. Only a trained physician can determine an accurate diagnosis and proper treatment.

What is EMR Polypectomy?

What is EMR Polypectomy?

You may have heard of the word “polyp” before.

Polyps are abnormal tissue growths that most commonly develop in the colon. They look like small bumps and may even resemble mushroom stalks.

While most polyps are benign (non-cancerous), because it’s an abnormal tissue growth, there’s a high chance it can become cancerous and cause you tons of problems later on.

That’s why polyps need to be examined and removed as soon as possible.

That’s what the EMR polypectomy is for.


EMR Polypectomy

Endoscopic Mucosal Resection, or EMR, is a procedure that involves the removal of polyps or tumors in the digestive tract which may be precancerous or at early stage cancer.

The instrument used in EMR polypectomy is an endoscope – a flexible narrow tube with a light and a video camera at the end that allows the gastroenterologist to see the inside of your body with elaborate details.

The endoscope is passed down to the patient’s throat to reach the site of the polyp either in the patient’s esophagus, stomach, or duodenum (the upper part of the small intestine).

The endoscope may also be guided up through the anus if the site of abnormality is found in the colon.
EMR is a curative procedure, but it may also be used for in-depth diagnostic and staging purposes as EMR is also useful in biopsy tissue sampling.

EMR also helps in determining whether cancer cells have already invaded tissues beneath the digestive tract lining.

EMR is also used to treat Barrett esophagus – a condition in which the cells that make up your esophagus begin to look like the cells that make up your intestines as cells were constantly exposed to acid due to years of gastroesophageal reflux (GERD).  


What is the Difference between EMR and ESD?

EMR is most effective for tumors that have not yet reached deeper layers of the gastrointestinal wall and are no larger than two (2) centimeters.

If the tumor has already reached deeper layers, your gastroenterologist may suggest an endoscopic submucosal dissection or ESD, a procedure used to remove deep tumors from the GI tract.


What Happens During an EMR Polypectomy?

EMR is a minimally invasive procedure that does not involve an incision.

Because of this, patients usually recover faster and experience less pain compared to open or laparoscopic surgery.

As it is usually done as an outpatient procedure, you will be able to go home the same day unless your doctor recommends otherwise.

Patients will be asked to arrive at the endoscopy unit three or more hours before the procedure to register and provide your medical history, including all taken medications.


Before the Procedure

Your doctor should give you written instructions on how to prepare for the EMR.

This usually involves fasting and emptying the colon, which is extremely important for your doctor to clearly see what’s going on inside your body.

You will also need to go on a strict clear liquid diet the day before the procedure.

A liquid laxative or an over-the-counter enema kit might also be prescribed to help empty out the colon.

Once you arrive at the clinic, a nurse will ask you some questions and fill up the necessary paperwork. You will then be asked to change into a gown.

Your pulse and blood pressure will be checked, and a small needle will be inserted into the back of your hand.

Your doctor should also explain to you the procedure, the benefits and risks, and answer any questions that you may have.

You will be asked to sign a consent form to confirm your understanding of what the gastroenterologist has explained and to signify your consent to the procedure.


emr_polypectomy

During the Procedure

You will be asked to remove false teeth or glasses before lying down on a trolley on your left or right side, whichever is comfortable for you.

Your doctor will give you sedation to make you feel relaxed and drowsy.
Pain relief will also be administered.

The sedation is not a general anaesthetic. You will still be able to hear the nurses/doctor talking to you. However, the effect of sedation may cause you to not remember the procedure afterward.

You will also be given oxygen to aid in breathing.

The endoscope will be gently inserted through the mouth/anus, wherever the location of the tumor, and images of your GI tract will be observed by the doctor on the screen.

Sometimes, applying a suction to the top of the tumor is necessary to further lift the tumor up away from the other tissue.

This prevents creating further damage to the surrounding tissues during the procedure.

Your doctor will then insert a thin wire rope through the endoscope to cut the tumor at its base and seal the cut at the same time.

The tumor will then be retrieved through suction and pulling through a specialized retrieval tool that will be passed through the endoscope.

A laboratory examination will confirm if the tumor has been completely removed from the GI tract.


After the Procedure

After the procedure, you will be transferred and monitored in a recovery room while the sedative wears off.

Occasionally, the sedative lowers the blood pressure and may also cause breathing problems. This makes it important to closely monitor your pulse and blood pressure before being cleared to go home.

Before you leave the facility, your gastroenterologist will discuss after-care and the next steps you need to take.

You shouldn’t drive (vehicle insurance will become invalid), operate any machinery, drink alcohol, or sign any legally binding documents within 24 hours after the procedure.

At home, you may drink or eat as normal, but try to eat a high-fiber diet.

Some of the after-effects of EMR include slight bloating and bleeding, sore throat, nausea, and vomiting. These are normal and should subside within 24 hours. If not, call your doctor immediately.


What are the Risks of EMR?

EMR is proven to be a safe and effective technique in the management of GI lesions when performed by an experienced gastroenterologist or endoscopist, given that it is applied only on an appropriate lesion.

Bleeding is the most common complication during EMR that can be detected and corrected even during the procedure.

There’s an extremely slight chance (1 in every 1500 people) for you to suffer a perforation or significant bleeding that requires an operation and/or blood transfusion.

There is also a slight risk of narrowing of the esophagus which may lead to difficulty in swallowing and may require further treatment.

There may also be a slight risk of puncture on the site where the lesion has been removed.

If you develop fever, chills, vomiting, black stool, bright red blood in the stool, chest or abdominal pain, shortness of breath, and/or fainting after undergoing EMR, you must seek medical attention immediately.

With that said, the chances for these complications to happen are very slim. When properly done, the benefits of EMR far outweigh the risks.

                               EMR-Polypectomy-Cape-Town

Follow-Up Appointment

You will likely have a follow-up appointment with your doctor to discuss the results and findings of the EMR.

It is important to ask your doctor if they were able to remove all the abnormal tissues and if there were any cancerous among those tissues.

Three to twelve (3-12) months after the procedure, a follow-up exam may be performed to make sure that all abnormal lesions have been completely removed from the GI tract.

EMR polypectomy is a safe procedure that has saved millions of lives.

In the care of a good gastroenterologist, the procedure should go smoothly without any hitch.

If you need a trusted gastroenterologist to perform your EMR polypectomy in Cape Town, give Dr. Deetleefs a call today.


GIDoc Cape Town

Patient-focused GI treatments and procedures in Cape Town.

Monday-Friday 8AM-4PM.

Connect with Us

© Dr. Eduan Deetlefs, Registered Gastroenterologist, GI Doc Cape Town

Our website information is not intended or implied to be a substitute for professional medical advice, diagnosis or treatment. Please consult a doctor about your specific condition. Only a trained physician can determine an accurate diagnosis and proper treatment.

Liver Disease: Symptoms and Treatment

Liver Disease: Symptoms and Treatment

The liver is one of the most important organs in our bodies with a key role in digesting food and getting rid of toxic substances.

This is why liver failure is one of the worst conditions you can have.

It compromises your immune system, causes deterioration of brain functions, may lead to kidney failure, and, in many cases, even death.

The good news is a liver disease can be prevented by simple lifestyle changes. Liver disease can also be successfully treated with early detection and proper medical intervention.  

liver-anatomy


Anatomy of the Liver

The liver is known as the second-largest organ in the body. An adult’s liver can weigh approximately 3 pounds and can be as large as a football.

It’s reddish-brown in color and sits just under your rib cage on the right side of your abdomen.

The liver is divided into two sections, the right and left lobes.

The right lobe receives blood primarily from the intestine while the left lobe receives blood coming from the stomach and the spleen.

Both lobes are made up of 8 segments which are comprised of a thousand small lobes called “lobules”.

These lobules connect to a network of small ducts (tubes) that also connect with larger ducts to ultimately form the network of the hepatic duct.

Bile, a clear yellow or orange fluid produced by the liver to help break down fats and digest food, passes through the hepatic duct down to the gallbladder and the duodenum, the first section of the small intestine.


The Primary Functions of the Liver

The liver is a powerhouse that performs over 500 life-sustaining functions.

Its main function is to filter the blood coming from the digestive tract before it passes through the rest of your body.

The body cannot perform its metabolic processes without the liver. Nutrients cannot be absorbed by the body without the liver.

Even medicines cannot be broken down and be used by the body without passing through the liver.

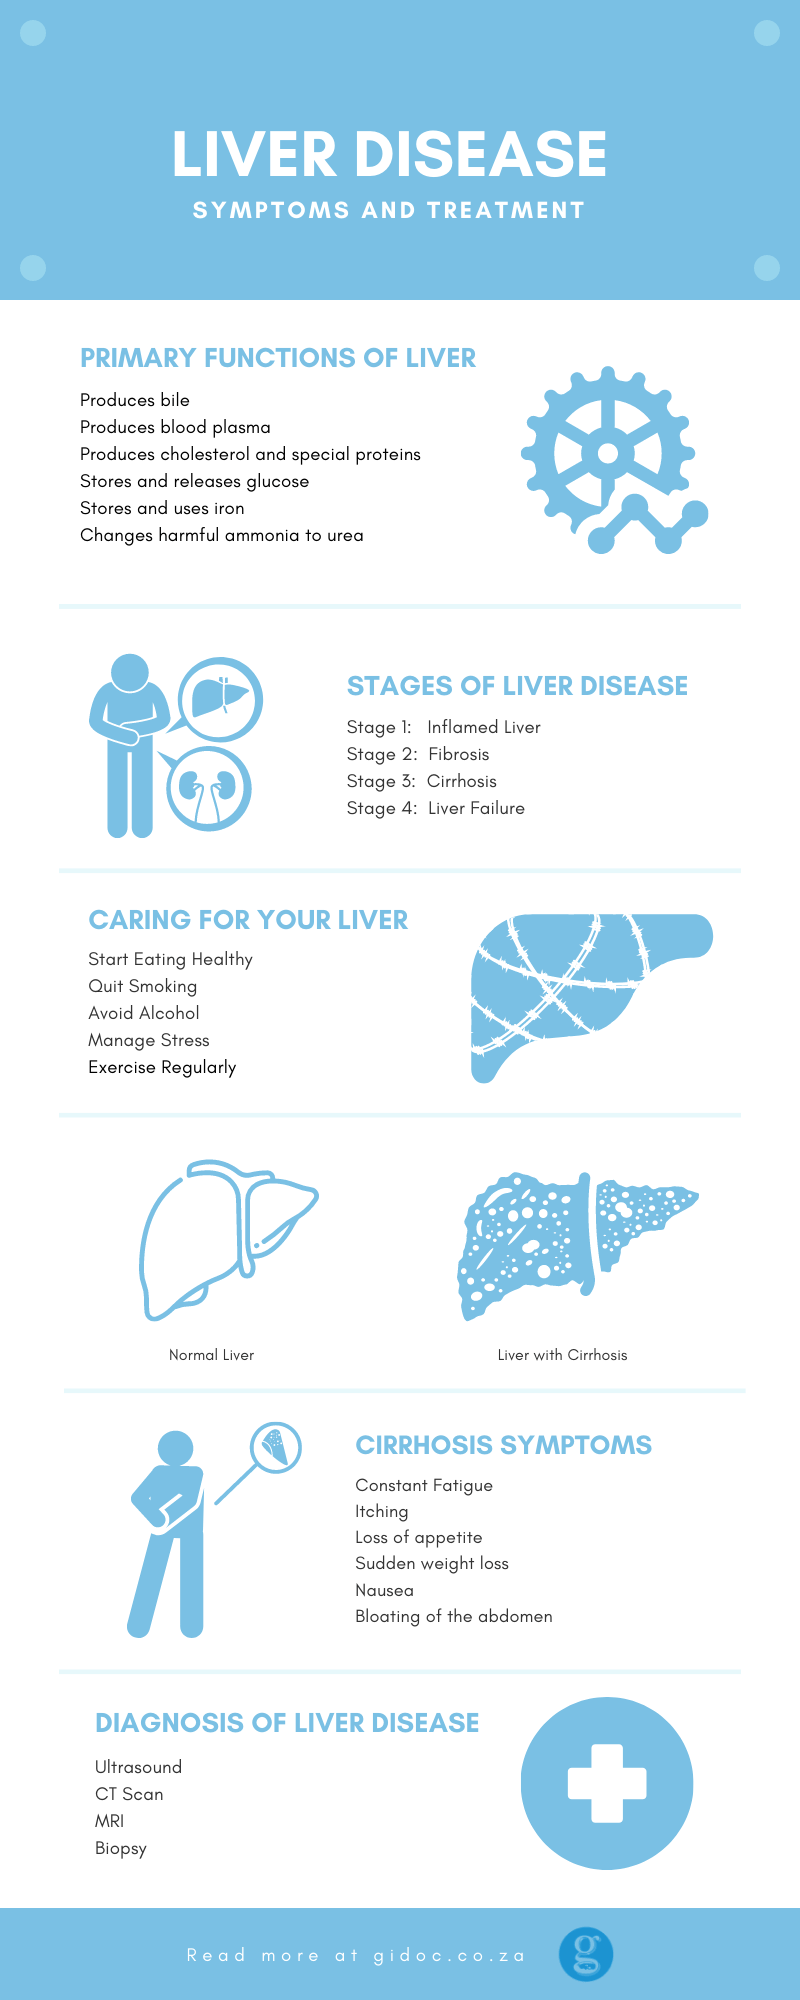
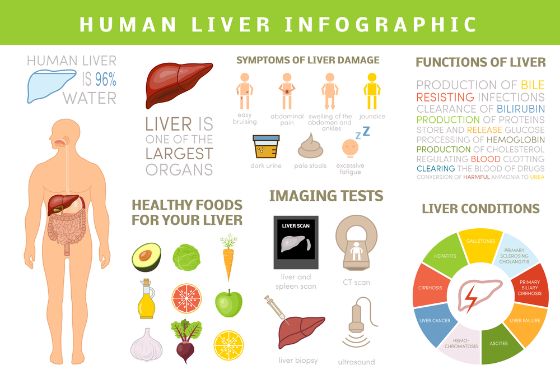
Here is a list of the primary metabolic processes the liver performs:

1. Produces bile, which helps carry away waste products and break down fats to prepare them for further digestion and absorption

2. Produces blood plasma from certain proteins. Blood plasma carries nutrients, hormones, water, salts, enzymes, and proteins to different body parts. Cells also deposit their waste into the plasma

3. Produces cholesterol and special proteins to transport fats through the body

4. Stores and releases glucose as the body needs it

5. Stores and uses iron from processing hemoglobin

6. Changes harmful ammonia to urea to be excreted through urine

7. Filters the blood of medicines and other toxic substances.

8. Regulates blood clotting.

9. Produces immune factors and removes bacteria from the bloodstream to help the body fight infections.

10. Clears blood from bilirubin, a compound that causes the skin and eyes to turn yellowish when it reaches higher-than-average levels.

 Liver-Disease-Symptoms-Treatment-infographic


Liver Disease: Stages, Diagnosis, and Treatment

The liver has amazing abilities to self-repair. In fact, it is the only organ in the body that can grow back after parts of it were removed or damaged.

However, repetitive abuse may lead to liver failure and even death.

Liver disease is caused by a variety of factors – genetics, viruses, or, most commonly, unhealthy lifestyle choices (e.g. alcoholism and obesity).

Over time, these conditions may lead to the scarring of the liver (cirrhosis), which can lead to liver failure.

Detecting liver disease in its early stages increases the chances of reversing the damage, so it’s important to know what symptoms to watch out for.


stages-of-liver-damage


4 Stages of Liver Disease

There are different kinds of liver disease but with any liver disease, the symptoms and liver damage will progress in a similar way. 

STAGE 1: An Inflamed Liver

Having an enlarged or inflamed liver is a sign that your immune system is responding to foreign substances (i.e. toxins) in the body.

There could be excess fats, too many toxins, or a viral infection that is causing your liver to swell up.

A non-alcoholic fatty liver, a fatty liver, liver hepatitis, viral hepatitis, or autoimmune hepatitis, are some of the conditions that may bring about an inflamed liver.

A patient with an inflamed liver reports stomach pain or a burning sensation at the upper right area of the abdomen; however, in some cases of non-alcoholic fatty liver, there will be no symptom of inflammation at all.

See your Gastroenterologist immediately if you have felt any sign of liver damage. Treating your liver at this stage can help reverse liver damage.


STAGE 2: Fibrosis – The Start of Liver Scarring

If the liver is left inflamed, fibrosis will take place. Fibrosis is the process where scarring in the liver starts due to constant inflammation.

The scar tissues will replace healthy liver tissues and will eventually reduce liver function.

The scar tissues will also cause toxins and fat to continually build up and in turn block blood to flow to the organ.

At this stage, you’ll still have a chance to save your liver through medication and lifestyle management.


normal-liver-vs-liver-with-cirrhosis


STAGE 3: Cirrhosis – Most Severe Scarring

Not treating fibrosis will lead to the development of cirrhosis, which is a severe scarring of the liver. 

At this stage, the liver can no longer heal itself and thus may lead to many complications including cancer.

Here are some of the symptoms or complications:

  1. Constant fatigue
  2. Itching
  3. Loss of appetite
  4. Sudden weight loss
  5. Nausea
  6. Bloating of the abdomen
  7. Edema or swelling due to a build-up of fluid in the feet, ankles, or legs
  8. Spider-like blood vessels found on the skin
  9. Jaundice – yellowing of the skin and eyes

The treatment of liver disease done at this stage is to control the progress of scarring, as well as dealing with any complications and symptoms that may arise from cirrhosis.


STAGE 4: Liver Failure

Unfortunately, at this stage, your liver has lost all its ability to function, making it unable to heal.

Your physician will immediately give you medical attention to salvage what is left of your liver; but if this is no longer possible, the only remaining option is to have a liver transplant.


Diagnosis of Liver Disease

If you have been experiencing any of the previously mentioned symptoms, it’s crucial to schedule an appointment with a doctor as soon as possible.

A thorough examination of your health history and physical examination will help find the cause and extent of liver damage.

Your doctor may ask you to undergo several liver function tests through blood extraction.

Other blood tests might also be done to look for specific liver problems or genetic conditions.

Imaging tests such as ultrasound, CT scan, and MRI might also be recommended to show liver damage.

A biopsy (removal of a tissue sample from your liver) might also be conducted to further look for signs of liver disease or liver damage.


human-liver-infographic


How to Care for Your Liver

Lifestyle changes cannot reverse cirrhosis but they can help to delay or stop the progression of liver disease and help prevent further complications.

Here are some of the lifestyle changes that can help you care for your liver while it’s not yet too late:

1. Start Eating Healthy

It all starts and ends in nutrition. Eat a balanced and healthy diet, limit your consumption of processed foods, detoxify your system by staying hydrated, and avoid sugary and salty food.

2. Quit Smoking

Cigarettes contain a host of toxins that can pose a serious toll on the health of your liver as the liver is the primary organ that filters toxins from our blood.

3. Avoid Drinking Alcohol

Alcohol is your liver’s worst enemy. Constant consumption of alcohol above the recommended limit can lead to severe liver damage or failure.

4. Manage Stress

Not many realize that stress can affect one’s overall health. Stress is like toxins not just to our mind but also to our organs. To make your liver healthy again, make sure to avoid getting stressed or find effective stress management techniques.

5. Regularly Exercise

Regular exercising and maintaining a healthy body weight lowers the chance of fat accumulation in the liver.

Our liver is one of the hardest working organs in our body as it works overtime to rid our bodies of toxins.

Maintaining a healthy lifestyle and seeking medical advice as soon as symptoms of liver damage occur are keys to keeping our livers healthy well into our senior years.

GIDoc Cape Town

Patient-focused GI treatments and procedures in Cape Town.

Monday-Friday 8AM-4PM.

Connect with Us

© Dr. Eduan Deetlefs, Registered Gastroenterologist, GI Doc Cape Town

Our website information is not intended or implied to be a substitute for professional medical advice, diagnosis or treatment. Please consult a doctor about your specific condition. Only a trained physician can determine an accurate diagnosis and proper treatment.

Routine Colonoscopy Screening: Important Information

Routine Colonoscopy Screening: Important Information

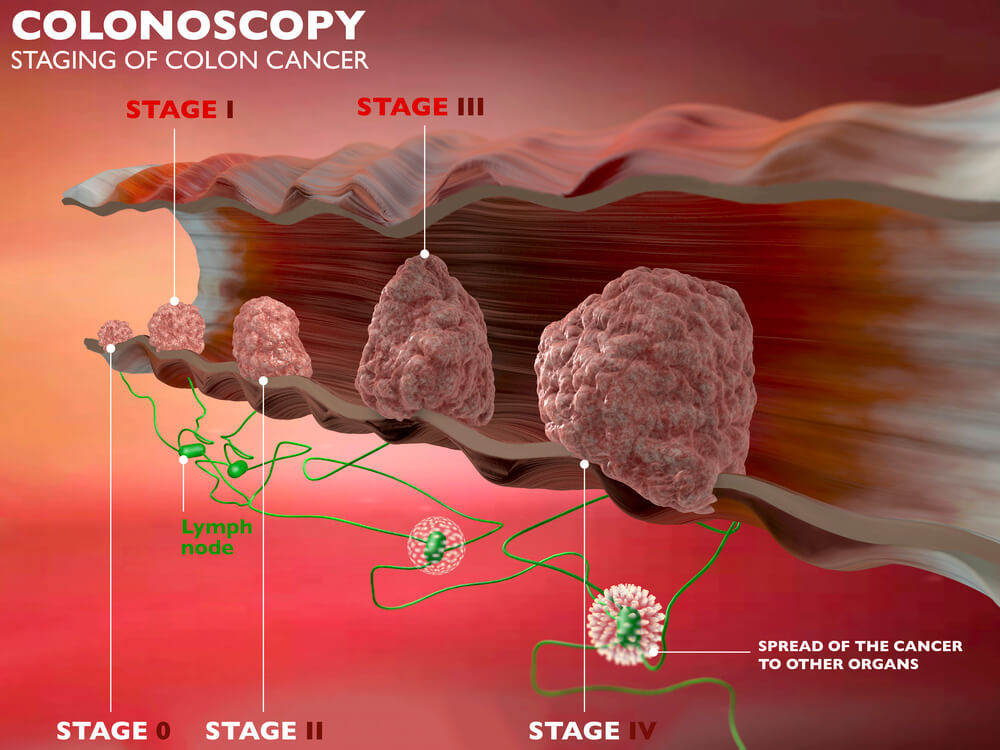
Colorectal cancer (CRC) is cancer that occurs in the colon or rectum, where abnormal growths called polyps form.

According to the World Cancer Research Fund, colorectal cancer is the third (3rd) most common histologically diagnosed cancers worldwide.

This ranking is also true in South African cancer cases among women, while it ranks as the

second (2nd) leading cause of cancer deaths among South African men, which, only has as little as 0.1% survival rate.

A routine colonoscopy screening might be just what you need to not join the statistics.


What is a Routine Colonoscopy Screening?

A colonoscopy is a procedure doctors conduct to screen for colorectal cancer and can also help diagnose unexplained changes in bowel habits and abdominal pain.

Even without symptoms, undergoing a routine colonoscopy can help your doctor locate polyps so they can be removed before turning into cancer.

It aids doctors to find colorectal cancer at an early stage when a patient’s survival rate is still at its highest.

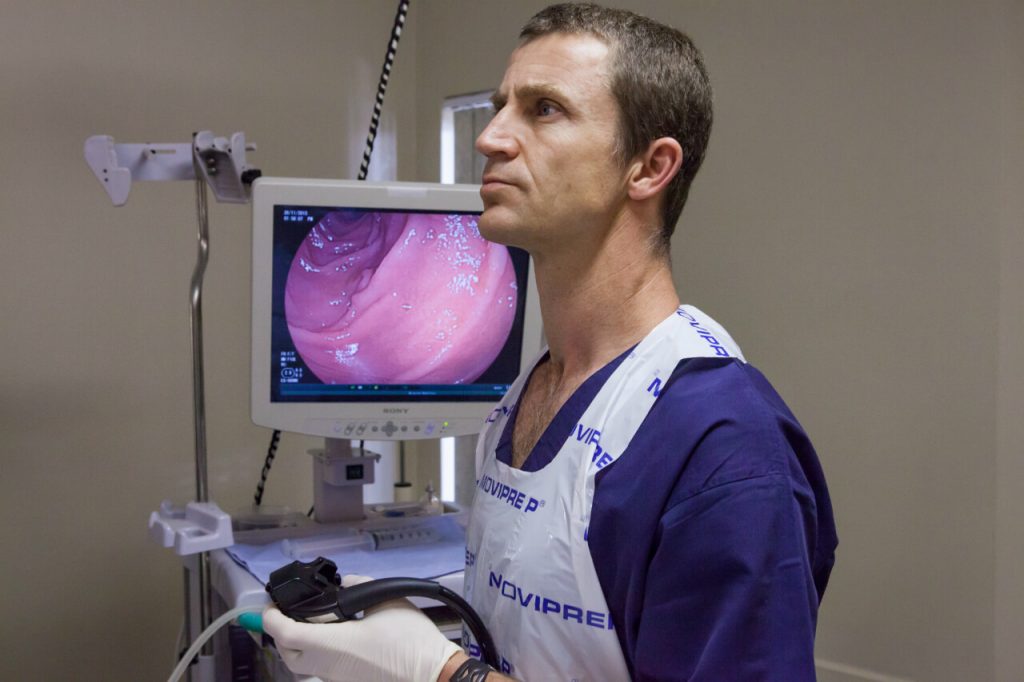
As it is a visual exam, colonoscopy screening involves the use of a colonoscope and a proctosigmoidoscope to look at the entire length of the colon and rectum.

These instruments are thin fiber optic devices with a light and video camera that are attached to the tip of a flexible tube to search for polyps.

The devices are passed through the anal orifice into the rectum and further inside into the colon. Mild sedation and pain medication are usually administered in this procedure.

Also, sspecial instruments can be passed through the colonoscope to get a biopsy (sample) or remove any suspicious-looking growths such as polyps if needed.


How Often Do I Need to Undergo Colonoscopy Screening?

Everybody should undergo a complete colonoscopy screening by the time they reach the age of forty-five.

By this age, the overall risk of developing colorectal cancer increases and early detection is vital for effective treatment.

If you are forty-five (45) years old or older, with an average risk of CRC you may have to routinely undergo colonoscopy once every 10 years.

People at increased or high risk of colorectal cancer might need to start colorectal cancer screening before age 45, be screened more often, and/or get specific tests.

As shown in this table, some indicators increase a person’s risk of developing colorectal cancer, and a higher risk requires more frequent colonoscopy screening:


INDICATORS Average Risk of CRC High Risk of CRC
  Colonoscopy requirement   Colonoscopy requirement
Personal history of colorectal cancer or certain types of polyps ✖ every 10 yrs. ✔ Regular colonoscopy, 1 year after previous surgery
Family history of colorectal cancer ✖ every 10 yrs. ✔ Before reaching age 45
Personal history of inflammatory bowel disease (ulcerative colitis or Crohn’s disease) ✖ every 10 yrs. ✔ Colonoscopy at least 8 years after being diagnosed with inflammatory bowel disease. Follow-up colonoscopies should be done every 1 to 3 years, depending on the person’s risk factors for colorectal cancer and the findings on the previous colonoscopy.

Personal history of getting radiation to the abdomen (belly) or pelvic area to treat a prior cancer


✖ every 10 yrs. ✔ Colonoscopy at an earlier age (depending on how old they were when they got the radiation); often begins 5 years after the radiation was given or at age 30, may need to be screened more often than normal (such as at least every 3 to 5 years).
With genetic disease ✖ every 10 yrs. ✔ Colonoscopy as early as teenage years


Colonoscopy Routine Screening vs. Diagnostic Colonoscopy

Screening colonoscopy and diagnostic colonoscopy basically perform the same procedures and only differ in purpose and timing.

While screening colonoscopy is a preventive measure to screen patients for cancerous polyps when they reached a certain age or if they have a family history of colon cancer, diagnostic colonoscopy is more of a curative response.

Diagnostic colonoscopies are done when a patient already exhibits specific symptoms that may suggest colon cancer, such as persistent diarrhea or constipation; blood in the stool; persistent abdominal cramps, gas or pain; weakness or fatigue; unexplained weight loss; and that feeling of not being able to empty completely no matter how many bowel movements.


stages-of-colon-cancer


It is important to note that most colorectal cancer patients experience no symptoms in the early stages of the disease.

When symptoms start to show, cancer cells have most likely grown within the large intestine; therefore, it is important that you get screened.


Preparation: Things to Do to Prepare for a Colonoscopy

For your colonoscopy to be a success, you need to endure the hardship of purging as you need to empty your colon.

You will be prescribed a powerful bowel-clearing laxative resulting in frequent bowel movements or diarrhea both the night before or the morning of the procedure.

Failure to empty your colon may cause the polyps and lesions to be missed, the colonoscopy may take longer (increasing the risk of complications), or the whole process may need to be delayed and rescheduled – which means you will undergo another round of bowel prep (which you wouldn’t wish to).

Your doctor may ask you to refrain from ingesting solid food and only intake water the day before your procedure.

If you have pre-existing conditions like diabetes, heart problems, or high blood pressure, or if you have been on medication or supplements with iron, let your physician know at least a week before the screening.

Also inform your doctor if you have been taking aspirin, warfarin (Coumadin, Jantoven), anticoagulants like dabigatran (Pradaxa) or rivaroxaban (Xarelto). You might be asked to adjust your dosages or stop taking the medications temporarily.


During: What Happens During a Colonoscopy

The whole procedure typically lasts approximately 30-60 minutes and may take longer if the doctor sees abnormalities that need removal.

Many people are given medicines so they are put into a sleepy state where they can still converse but they won’t have any memory of the conversation.

You may still feel mild cramping during the procedure which you can reduce by taking several slow deep breaths. Some people, however, may need stronger anesthesia.

You will be asked to lie on your left side on the examining table as the doctor will insert the colonoscope through the rectum and advance to the other end of the large intestine while the instrument transmits images of the colon lining to the screen.

The scope is bendable so the doctor can move it around the curves of your colon. You may be asked to change position as needed to facilitate the moving of the scope.

Your colon expands as the scope blows air into your colon so the doctor can see more clearly.

When the doctor has finished, he will slowly withdraw the colonoscope while carefully examining the lining of your bowel.

after_treatment_colonoscopy

Recovery: What to Do After a Colonoscopy

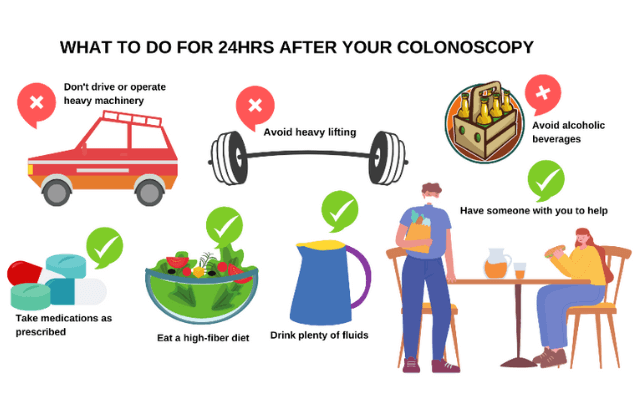
It is particularly important that you are accompanied by someone in the next 24 hours after your procedure.

As you have been sedated, it is not recommended that you drive, fly, or do any strenuous activity.

Watch your diet, drink plenty of fluids, and stick to your prescribed medications.

If polyps have been removed in your colon, you might need to take at least 7 days to rest and alter your activities including exercising 

Possible Risks of Colonoscopy

Although rare, some complications may arise after a colonoscopy. Studies estimate the overall risk of complications for routine colonoscopy to be as low as 1.6%.

Perforation (a hole in the intestine), bleeding, post-polypectomy syndrome, reaction to anesthetic and infection are some of the possible complications that may occur.

Despite these, colonoscopy is an overall very safe test, and the benefits of undergoing routine colonoscopy screening far outweigh the discomfort and possible risks that may arise.

We highly recommend that you get screened because as the saying goes, “prevention is better than cure”.

GIDoc Cape Town

Patient-focused GI treatments and procedures in Cape Town.

Monday-Friday 8AM-4PM.

Connect with Us

© Dr. Eduan Deetlefs, Registered Gastroenterologist, GI Doc Cape Town

Our website information is not intended or implied to be a substitute for professional medical advice, diagnosis or treatment. Please consult a doctor about your specific condition. Only a trained physician can determine an accurate diagnosis and proper treatment.